Sunday, March 25, 2012

Paprika Potatoes


I’m always looking for quick easy ways to fix potatoes.  I love baked red potatoes SO much!  But I can’t buy just two or three for dinner, I have to buy the whole darn bag!  Then the next thing I know, I have just a couple left and I’m ready for something different.

This recipe is absolutely one of my faves.  Maybe it’s my love for paprika, or maybe it’s my love for red baked potatoes, or maybe it’s my love for simple recipes … that I often forget about and then fall in love with all over again.  Whatever it is, I’m sharing it with you!

Just peal a few potatoes.  (I chose red, but you could use your favorite).  Next combine olive oil, salt, pepper, and paprika.  You could mix all of this in a ziplock bag.  I chose to mix it in a corning ware dish with a lid … because I hate wasting things like ziplock bags.  I like to reuse :)  Pour the mixture over the potatoes and toss to combine.


Spread the potatoes in a single layer on a cookie sheet (or a jelly roll pan; it’s best if the sheet has a lip on it so the oil doesn’t run all over your oven).  And bake for 40 minutes.


Yumm!!  I usually let my potatoes get a little bit darker than this, just because I like them that way.  But the night I fixed this, we were on a tight time schedule, so I could only go for 40 minutes.  As long as the potatoes are baked all the way through, you can choose how dark you want them to get.

Enjoy!

~~~~~~~~~~~~~~~~~~~~~~~~~~~~~~~~~~~~~~~~~~~~~~~~~~~~~~~~~~~~~~~~
Paprika Potatoes

3 pounds potatoes, cut into 1-inch pieces (about 8 cups)
¼ cup olive oil
1 ¼ teaspoon salt
¼ teaspoon pepper
1 ¼ teaspoon paprika

Preheat oven to 350 degrees.  In bowl, toss potatoes with oil, salt, pepper, and paprika.  Spread potatoes on large jellyroll pan.  Roast, turning once, until potatoes are tender and golden brown, about 40 minutes.
~~~~~~~~~~~~~~~~~~~~~~~~~~~~~~~~~~~~~~~~~~~~~~~~~~~~~~~~~~~~~~~~

Saturday, March 24, 2012

Easy Party BBQ Meatballs


I have to share this simple recipe with you.  It’s one I rarely make for dinner, but I make all the time for parties, get-togethers, etc etc.  It’s just so stinkin’ simple and everyone requests them – so I don’t mind bringing them.

Even though I rarely make them for supper, it doesn’t mean you can’t!  I was looking around the pantry trying to come up with some ideas for dinner, when I saw I still had a bottle of BBQ sauce leftover from this and I had a jar of jelly that I got for super cheap here.  So why not use them both?

I also grabbed a box of pre-made meatballs from the store, because I was short on time.  But if you have a few extra minutes, by all means, make your own!  Although, one word of advice, I usually get the store brand (at Walmart) but I went to Food Lion and this was the only brand they had… and it was gross.  So if you do buy your own meatballs, don’t get this brand :)


I’m not kidding that this is simple, and so yummy!  Mix the BBQ sauce and the grape jelly in crockpot.  Don’t worry if at first it looks chunky from the jelly.  Once it heats, the jelly will become less congealed and more liquid like.


Cook on low or high for however long you need to heat them thoroughly or until you’re ready to serve.  As long as your meatballs are already cooked, you just need to heat them!  And before you know it, viola!  So easy … even my sister can make them.  ;)


So yes, they are easy for parties with lots of finger foods.  But they can also be a part of a well-balanced meal.


I’ll share that potato dish soon!  Happy partying!!

~~~~~~~~~~~~~~~~~~~~~~~~~~~~~~~~~~~~~~~~~~~~~~~~~~~~~~~~~~~~~~~~
Easy Party BBQ Meatballs

-1 jar of BBQ sauce
-1 jar of grape jelly
-1 package of frozen plain meatballs, or pre-made cooked meatballs

Combine BBQ sauce and grape jelly in crockpot until well blended.  Begin to heat the sauce.  Add meatballs and cook in sauce until warmed thoroughly.
~~~~~~~~~~~~~~~~~~~~~~~~~~~~~~~~~~~~~~~~~~~~~~~~~~~~~~~~~~~~~~~~

Friday, March 23, 2012

lessons learned


So I’ve been pretty much MIA for a week…. or two.  Whoops.

A lot happened over the last few weeks.  The biggest news is, I got our living room back in order!!  Without getting sent to the hospital this time for “over-doing-it”  :)  even better!  Big thanks to my sis who spent part of her spring break moving things for me.  She’s awesome!  And she also did our maternity photo shoot.  Sis has gone pro with her photography business, and yet hubs and I still managed to be her first baby-bump shoot.  It’s like we planned it that way or something.  Hehe.

So what have I been up to since last blogging?  All sorts of things.  I got the living room cleaned, lots of new recipes, went to a friend’s daughter’s first birthday party (omgeeeee I can’t believe she’s one!) had my first baby shower, designed the thank you cards and started making them … oh, and learned a few lessons along the way.

What not to do.

#1 – Don’t leave a plastic cutting board in the drawer beneath your oven if you are going to clean it.  I’ve never had this happen before, but apparently my new oven cleans at a higher temperature than my old oven.

 
Truth is, I’ve been wanting new cutting boards for a while.  This was NOT my plan to get them.


#2 – If you think you can make one of those adorable fabric covered cardboard boxes that everyone is pinning on pinterest with just this:

cardboard box, scissors, tape, thick white paper

…you’re wrong.  It definitely needs spray adhesive.  Otherwise, it turns out like this:


Not what I had in mind.  And while paper is much cheaper than fabric, it doesn’t look nearly as nice.

#3 – While preparing this wonderful meal:


I managed to severely slice my finger.  Which meant I burned these:

Epic fail.  They still tasted yummy … just a little dry.  So I guess all wasn’t lost.  [oh and the finger is fine.  It’s just … pregnant women bleed … a LOT.  So it took quite a while to heal.]

#4 – When stamping, check the ink on textured cardstock before stamping.  Oh, and always measure before you cut.  Or your card will turn out disastrous.


Fortunately she’s only one, so she didn’t know any better.  Sorry for the purple fingers, Mom and Dad!

And there you have it!  My lessons learned.  Hey, what’s life without a few mistakes?
Look for more on those recipes in the future.  And check back for my thank you card design.  And hopefully those maternity pics too!!

Friday, March 9, 2012

Flashback Friday: think spring ... cakes!

I’m in complete denial, but it has officially been one year since I did my last cake.  Are you serious?  Life got so hectic and I had piled waaaaaay too much on my plate, so I went into “retirement” promising to pick it back up one day. 

Truth is: I miss it.  A lot.  It was such a creative outlet for me, and suited me better than any other outlet I’ve found.  But at the same time, I’m not ready to pick it back up yet.  Unless you are a fellow caker, you really have no idea how much time goes into each cake.  Not just planning and prepping, but baking, frosting, décor, delivery, and clean up.  …which often takes as much time as everything else.  When I did cakes full time (and by full time I mean, I had a full time real job and I was still cranking out three custom cakes a week – that was a ton of work for me) my house stayed a disaster.  I would get it cleaned from one cake just in time to start the next.  It was a never ending, VERY VERY exhausting cycle.

Sometimes I get the itch again and I’ll reminisce back through my old pictures of cakes.  Sometimes I view them and think “wow I can’t believe I did that.”  Most of the time I look back and think “wow, I wish I could do this one again – it would turn out a lot better.”

So in the hopes for spring (doesn’t it feel woooonderful outside??)  I thought this flashback Friday could be all about spring time cakes!  Granted, I’ll only show you a few.  And do keep in mind that they span from one of my very first cakes to one of my last cakes.  You’ll see what I mean if you try to critique them.  ;)

Think spring!

After a long, hard winter that year, that’s all we wanted to do – think spring!!


This year, we barely saw any snow.  But it’s still exciting to see the first signs of beautiful flowers.


If any of you are Texans out there, how about a few bluebonnets?


Last one for today:


Thanks for looking.  Enjoy this gorgeous weekend!!


Thursday, March 8, 2012

bathroom closet makeover


This week I set out to reorganize our bathroom closet.  It was part of the “still unpacking boxes of junk from our old house” that I’ve been working on for about a month now.  I had to be forced to consolidate 3 bathrooms to one.  Not an easy task.

[Disclaimer, I am going to show you a lot of pictures of our bathroom.  Duh.  But seriously, it was decorated like this when we moved in – by our landlord.  At first, I was repulsed.  There’s only so much you can do with baby blue tile left over from the 70s, but I hated it.  The very first time I actually got ready in the bathroom though, my opinion changed immediately.  The decorations remind me of a tacky beach house.  So, literally, every morning I get ready for work or whatever, I feel like I’m at the beach!!  Not kidding.  Could be worse, my friends!  But I just wanted to forewarn you.  This is not my style.  If it were my bathroom, the fish would have been flushed a long time ago … along with that horrid wall color.  There.  I spoke my piece, now I can show you the place.  :) ]

When I had moved our essentials into the new place, our bathroom was still messy.  It looked like this:


Then I added all the bathroom stuff from the boxes I unpacked.  …after I threw away everything that I didn’t want any more or disposed of expired drugs.  [which was a lot, but the way.]  Even after that, I still had all this stuff:


At this point in my madness, my husband walked in.  His exact words were “I’m going to throw up”  haha!  He gets a little bit stressed to walk into the middle of one of my projects.

But after a few hours alone in the bathroom with nothing but a pair of scissors, shelf liner, and Pandora ABBA channel, it turned into this:


Ahhhhhhh!!  So much better!  And the total cost of this project: Free.  :)  I had all those little white storage containers.  Albeit, most of them needed a good scrub!  And I already had the shelf liner too.  Here are a few of my favorite things.

Best way to store bobby-pins ever?  Magnetic paper clip holder.  I’ve been doing this one for years.  It WORKS and I stick with it.


One thing I looooove about this bathroom is the drawers to the sides of the sink.  I haven’t had drawers next to my sink since I moved out of my parents’ house.  Oh how I’ve missed them!!  It makes organizing so much easier.  Check out these small plastic organizers I put in each drawer.  And yes, I lined the plastic with shelf liner so my stuff isn’t flying all over the place each time I open the drawer.


And of course, there’s some organization to each little bin – one for eyeliner/eye colors, one for brushes, one for foundations, and another for lips.  It makes my daily routine so much easier.  And yes yes yes, my eye colors are now alphabetized.  Need you even ask??


So there you have it.  That’s how I squeezed three bathrooms into one.  I made sure to include only what I use and got rid of a lot [a LOT] of expired drugs, meds, and make up.  Remember, cosmetics have a shelf life of three years, unless it’s mascara – that’s only 3 months folks!

This is such an easy task that really takes so little time.  It’s something that we all need to do more often than we do.  It’s no use keeping old cold medicine if it’s passed its expiration date.  …especially if it’s 5 years passed.  Yikes!

Tuesday, March 6, 2012

Book Review: Baby Bargains [Danger]


Book Review: The Complete Book of Baby Bargains: 1,000+ Best Ways to Save Money Every Day
by Kimberly Danger

So I bought this book before I did my baby registry.  I was clueless on what to get, and I was hoping it could give me a little view into what I needed and what I didn’t.  I was also hoping that I’d get some awesome money saving tips.  [Have you noticed a theme lately?  It’s pretty clear that I’m stressing about being able to afford this little one and not have to work as much.]

I give this book 3.5 <3s because… well, I kind of love it.


What I like about it: it’s super easy to read.  And it’s a super fast read.  Both are bonuses when you have a billion things to do before baby comes.  Danger also offers some great tips.  I really like her recipes for homemade wipes (although I haven’t tried it yet – I like the concept) and a few of the ideas of making things yourself.  She also gives some great laundry tips.  And I love her section on investing.  I don’t know why, but I hadn’t thought of this at all!  My mind was running 500mph with everything I need to purchase.  I didn’t even think about what I could do with the money I’ve saved.

What I didn’t like about it: I didn’t agree with everything she wrote.  But we’re all open to our own opinion!  Plus, what works for one person might not work for another.  And let’s be honest, the baby is still in my belly.  I’m clearly suffering from First-Time-Mom-Syndrome.  I might re-read this after baby is here and agree with her more!!

I’m not sure what I was expecting.  I guess I wanted more of “buy this stroller because it’s the best and here’s the cheapest place to find it.”  …this book is not that.  But then again, how could it be?  We would all have our own opinion as to which the best stroller is (otherwise there wouldn’t be 100 types to choose from).

All-in-all, even though it wasn’t 100% what I expected, I’m glad I read it.  Heck, I picked it up on ebay for just a few bucks, and I’m sure I’ll save that much just from her recommendations.  Plus, with how quickly you can fly through this thing, you won’t really be wasting your time!

[My favorite tip is # 452.  If you read it, let me know what your favorite tip is!]

In other news, I’ve decided to start putting my full website in a watermark on each of my images I post (that are my own).  I’m only doing this because of some of the things that have come up about Pinterest lately.  I specifically read this blog post and this one.  I agreed with these ladies’ perspectives and had already thought about doing it myself.  I’m definitely taking their lead.  I really hope all these issues work themselves out.  I don’t know what I’d do without Pinterest!!  By far, it’s one of the best things (creatively-speaking) that’s happened to my life!

Monday, March 5, 2012

my favorite money saving apps


Sometimes it’s hard for me to believe that not everyone has a smart phone these days.  In all reality, I’ve only had mine for about 6 months, but I’m finding it harder and harder to remember life before my phone.  Not that I couldn’t live without it, but it is SO convenient!!  Gone are the days to turning to your phone just for the calculator when it comes to saving money.  Now there are so many other apps you can use too!

[Disclaimer: I have an iPhone.  All of these apps were purchased on iTunes and would be compatible with iPods and iPads.  I’m sure there are equivalent apps available on the Android market for other smartphones, tablets, PCs, etc.]

Here’s a screenshot of my favorite money saving apps.  I’ll talk about them in order of their appearance.


Gas Buddy  Cost of this app: FREE

This is my newest app … and my husband’s newest obsession.  It uses your current location to search for gas stations near you.  It allows you to see the latest gas prices at that station.  You can have the app search for the closest station to you, or the cheapest station, so you can plan your trips accordingly.  You can even have it search for gas by the grade – so if your car needs premium gas, you can find the cheapest for that too.

How it works: super simple.  Press the big green gas tank on the front page.


Make sure you allow it to use your current location.  Then you will get a list of gas stations closest to you, with the price.

I blacked out those addresses and phone numbers :)

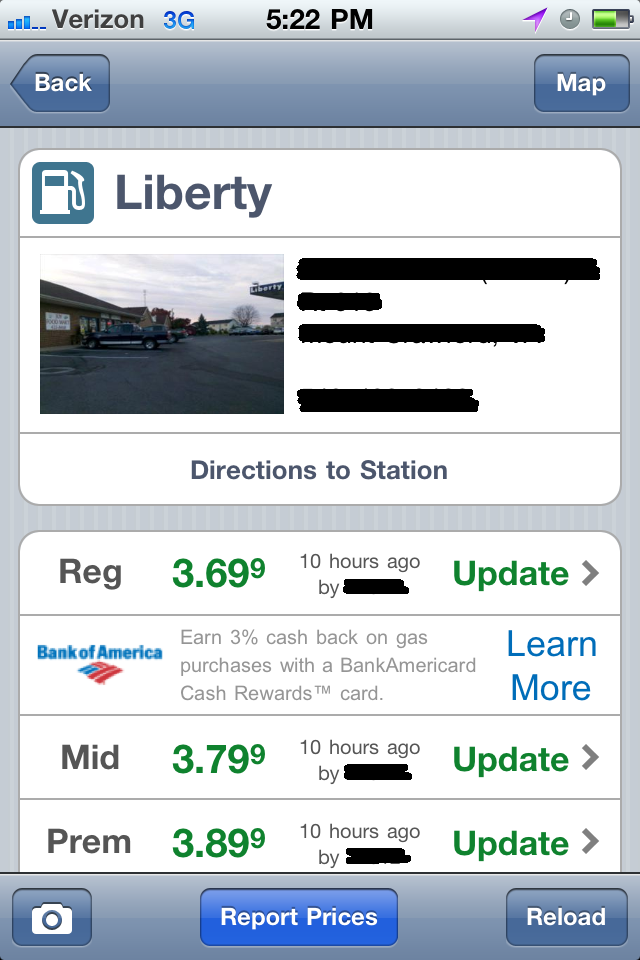
Click on the station that you are interested in, and you can see more details about the station.


You may notice in some of the pictures that the prices will say “updated 10 hours ago” or something similar to that.  How it actually works is, users can set up an account and update the prices as they see a change.  Now why in the world would you want to do that?  Because every time you update a gas price (I think they can only be updated twice a day per station) you earn points.  Points earn you tickets.  Tickets earn you a chance to win a $250 gas card, per week.  EVEN BETTER!

The catch – gas prices only get updated for each station if there are people in your area that are out there updating them on the app.  I’ve found in my area, quite a few people must have the app because just about every gas station has the accurate price.


EEBA  Cost of this app: FREE

EEBA – which I have no clue what it stands for – is like a virtual savings system.  It allows you to categorize where you want your money to go, and you can see where it goes each month.  A virtual budget, if you will.

This app allows you to create up to 10 envelopes.  You can label the envelopes whatever you wish, and add as much “money” as you wish to each envelope.  [My app is a work in progress; meaning I’ve just started to use this app, so my envelopes are unbalanced.  I’m just trying to give you a feel for the app.  I don’t want you to think I spent $200 on gas and only put 8 bucks into savings!]


I have envelopes listed as “groceries” and “gas” because I felt like those were two things we could somewhat control.  I didn’t put down envelopes like “internet” or “phone” because those bills are usually not negotiable.  Just my personal preference.  Every time I make a purchase within that envelope, I enter the date, the store, and how much I paid.  The app will tally up how much I have spent in each category and how much money I have left in each envelope.


The app also prorates each envelope based on the number of days in the month.  It will tell you if you are so many days “ahead” on the month [whoohoo you’re saving money and ahead of budget!!] or it will tell you how many days “behind” you are on the month [and suggests you stop spending for x number of days to catch up with your budget]. 

Bonus about this app: hubs, who also has an iPhone, can download this app and sign up under the same account as me.  So every time he makes a purchase, he can type it in, so we’re definitely bound to stay on the same page.

It can sometimes be a pain to remember to type in every entry, but if you can get in the habit of doing it as soon as you make the purchase, you’ll be on track to helping you budget where every cent goes.

If you’re not so good about typing in every entry as soon as you make the purchase, you might find the next app helpful…


Lemon  Cost of this app: FREE

This app is simple.  And I got it because I liked the concept, thought I would use it, and it was free.  The only problem is, I haven’t used it.  But that’s only because I stayed on top of entering everything as I went.  I guarantee you this will NOT continue in the future (I’m bound to slack once baby gets here!!) and I will use this.

Concept of the app: Scan your receipts.


This app will also let you see how much you have spent at a certain store just by scanning your receipt, but the EEBA app seemed to fit me better in this area.

Another reason it can be convenient to scan your receipts to your phone and save for later is if you want to reference back to them when using the next app.


Frugal  Cost of this app: $1.99 (well worth it!!)

I have been looking for something like this my entire life.  I’m not even joking.  So many times when I grocery store hop I’ve wondered “well Walmart has it for this price… but isn’t it cheaper at Giant?” but I couldn’t quite remember.  I even started carrying a small notebook in my purse to write down the price of certain items I used frequently so that I could compare the prices among my local stores.  The only problem was, not only was this sometimes difficult, but it was annoying when I wanted to compare the normal size to the bulk size (say at Costco).

Enter Frugal.  Ahhhhhhhhhhhh. Thank you!!!

Frugal allows you to compare prices of whatever item you want, between stores.  There are a few catches, but I don’t mind.

Catch #1 – it does not have preloaded prices.  So many people find this irritating.  But the grocery stores in my area are different than the ones in your area.  Grocery prices fluctuate across the country, not to mention very frequently.  And finally, what I frequently buy at the store may be something you never buy – so why clutter up your phone with information you don’t need.

Catch #2 – you have to enter every single thing yourself.  Yes, it sucks.  But again, in the long run, it’s very convenient to know you have the prices for what you want at the stores you want.  And if you don’t have time to visit your favorite stores and enter the prices of all those items, simply buy your weekly groceries at the store and copy the prices from your receipt.  [that’s how that Lemon app might be beneficial to you.]


So enter the item you want to compare at the top.  Then you can enter the store name and how much it costs at that store.  Again, this is a very new app to me, and I understand it’s a work in progress.  So for many of the items, I only have one store entered.  Another bonus about this is it allows you to add all sorts of quantities – which makes it super easy to compare regular size items to bulk items.  Once the prices are entered, it makes it easy to compare stores and see which store has the cheapest price.


Never again will you wonder, “can I get this cheaper across town?”  Also, not digging the idea of buying the items and copying the prices from the receipt?  I think hanging out in a grocery store with my phone for an hour or two on a 100 degree summer day sounds like an easy (and CHEAP) way to cool down.  But maybe that’s just me.


RL Classic  Cost of this app: FREE

Similar concept to the last app, this app allows you to compare prices by simply scanning the barcode.  I use this app a lot when I’m shopping for bigger items that I don’t need right this second.  [I don’t use it for groceries, because a lot of the time I can find a better deal online … and I don’t want to wait for shipping when it comes to grocery-like items].

This app is so easy to use and very hassle-free.  Simply find the barcode on the item you want to purchase and allow the bar code scanner (which uses the camera on your phone) to scan the barcode.


Once the app recognizes the product, it will scan the internet to find places to purchase the item and how much it costs.  It will even include places like eBay if you wish.


So simple!!  I can’t tell you how many times I’ve seen something in a store (especially books) scanned it, and realized I can get a better deal online.  Not only do I save money by purchasing the product somewhere else, but I’ve also cut down on impulse buying.  So many times I’ll scan an item, see a better deal, think to myself “I’ll order that when I get home” and then never get around to ordering it … because frankly, I don’t need it.

There’s only one downfall to this app.  A LOT of stores hate for you to use it.  Duuuuuhhhh!!  It takes business away from them!  Some stores even put their own barcodes on the item – overtop of the real barcode.  If that’s the case, this app won’t be able to recognize the item by simply scanning the store barcode.  It needs to actually scan the universal barcode (like pictured above).  I’ll confess.  I’ve been known to pull back those store stickers and scan the real one.  Or if that can’t be done, I’ll search through every single item on the shelf in hopes of finding one that has the sticker misplaced and leaves the real barcode exposed.  0:)

I’m sure there are 1000s of other money saving apps out there.  But these are the few I’ve discovered, and loooo-ve.  Drop me a comment if you use these or have found others helpful.  Happy saving!!